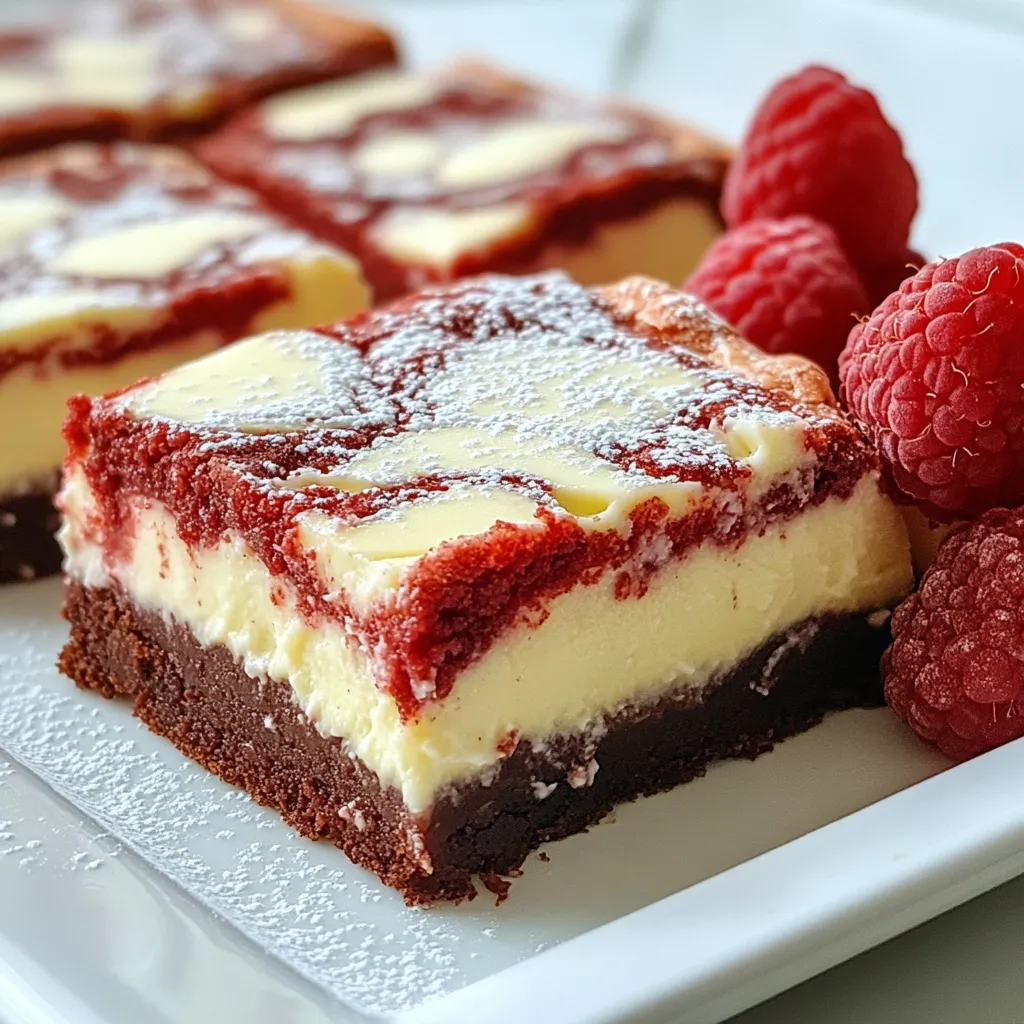
If you love rich brownies and creamy cheesecake, get ready for a treat! My Red Velvet Cheesecake Brownies blend two classic desserts into one delicious delight. Imagine soft, red velvet brownies topped with a smooth cheesecake layer—pure bliss in every bite. In this post, I’ll guide you through easy steps, share tips for the best flavors, and explore fun variations. Let’s create a dessert that will wow your friends and family!
Why I Love This Recipe
- Decadent Flavor: The combination of rich red velvet and creamy cheesecake creates a luxurious dessert experience that is hard to resist.
- Visual Appeal: The beautiful marbled effect of the red velvet and cheesecake layers makes these brownies a stunning centerpiece for any dessert table.
- Easy to Make: With simple ingredients and straightforward steps, this recipe is perfect for both novice and experienced bakers alike.
- Perfect for Any Occasion: These brownies are ideal for birthdays, holidays, or just a sweet treat to brighten your day!
Ingredients
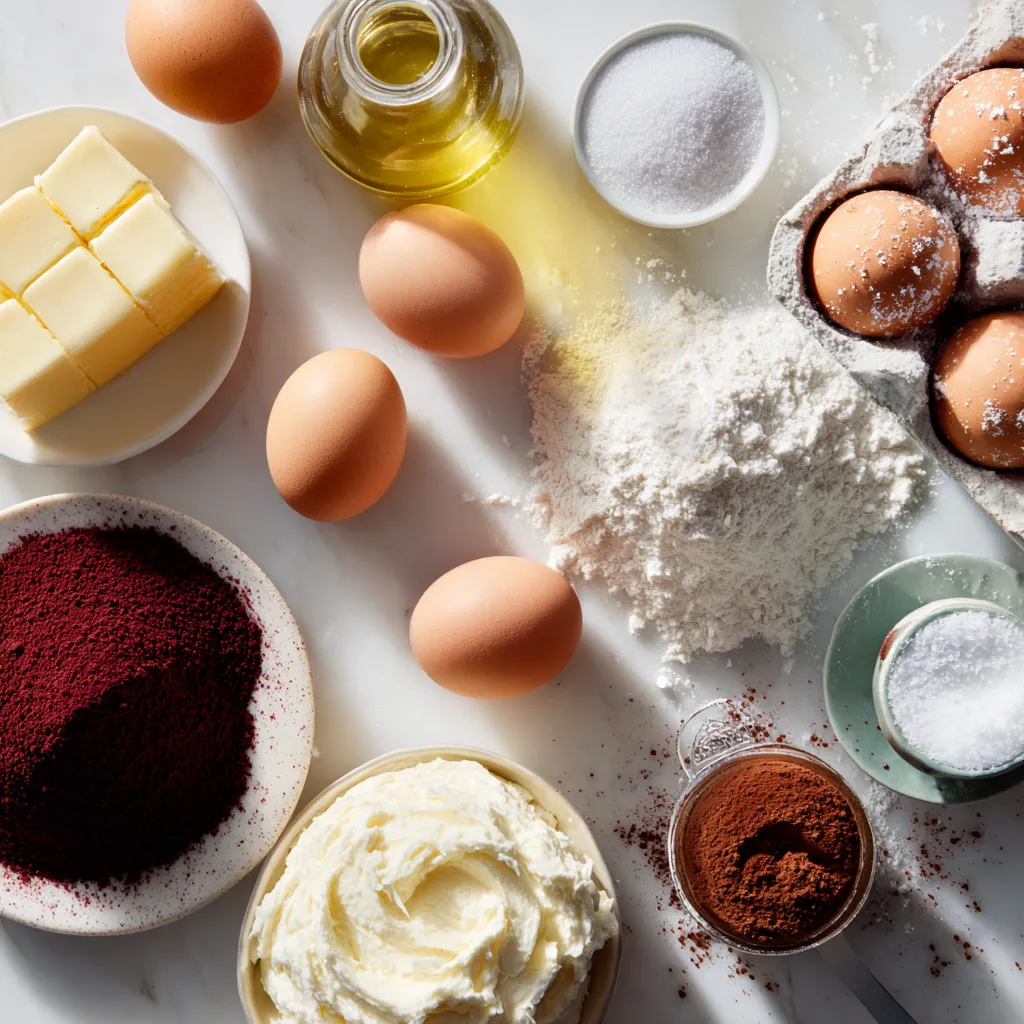
Main Ingredients for Red Velvet Cheesecake Brownies
To make red velvet cheesecake brownies, gather these main ingredients:
– 1 cup unsalted butter, melted
– 1 1/2 cups granulated sugar
– 1 teaspoon vanilla extract
– 3 large eggs
– 1 1/4 cups all-purpose flour
– 1/2 cup cocoa powder
– 1 teaspoon baking powder
– 1/2 teaspoon salt
– 1 tablespoon red food coloring
These ingredients come together to create a rich and soft brownie base. The melted butter adds moisture, while the sugar helps with sweetness and texture.
Key Ingredients for Cheesecake Layer
For the cheesecake layer, you will need:
– 8 oz cream cheese, softened
– 1/2 cup powdered sugar
– 1 egg
– 1 teaspoon vanilla extract (for cheesecake layer)
This layer adds a creamy, tangy contrast to the sweet, chocolatey brownie. Softened cream cheese mixes easily, creating a smooth texture for the layer.
Tips for Sourcing Quality Ingredients
To make your brownies shine, source fresh, quality ingredients:
– Choose unsalted butter for better control over saltiness.
– Use high-quality cocoa powder for rich chocolate flavor.
– Opt for pure vanilla extract instead of imitation for true flavor.
– Select fresh eggs, as they improve texture and taste.
– Look for cream cheese that is soft and creamy, as it blends better.
Buying the best ingredients enhances the overall taste of your brownies. Don’t hesitate to visit local markets or specialty stores for fresh finds.
Step-by-Step Instructions
Preparing the Red Velvet Brownie Base
Start by preheating your oven to 350°F (175°C). This step warms up the oven for even baking. Next, you need a 9×13 inch baking pan. Lightly grease it or line it with parchment paper. This makes it easy to remove the brownies later.
In a large bowl, combine 1 cup of melted unsalted butter and 1 1/2 cups of granulated sugar. Mix these until they blend well. Add 1 teaspoon of vanilla extract, then crack in 3 large eggs, one at a time. Make sure to stir well after adding each egg.
In another bowl, sift together 1 1/4 cups of all-purpose flour, 1/2 cup of cocoa powder, 1 teaspoon of baking powder, and 1/2 teaspoon of salt. This step helps remove lumps. Gradually add the dry mixture to the wet ingredients. Stir until just combined.
Finally, mix in 1 tablespoon of red food coloring. Stir until the batter is smooth and evenly colored. This is your red velvet brownie base.
Making the Cream Cheese Layer
For the cream cheese layer, take 8 ounces of softened cream cheese. In a separate bowl, beat it until creamy. Add 1/2 cup of powdered sugar, 1 egg, and 1 teaspoon of vanilla extract. Mix until the mixture is smooth and fluffy. This layer adds richness to your brownies.
Combining & Baking the Layers
Now, pour half of the red velvet batter into the prepared baking pan. Spread it evenly across the bottom. Next, carefully spoon dollops of the cream cheese mixture on top of the red velvet layer. Use a knife to swirl the two mixtures together. This creates a beautiful marbled effect.
After that, pour the remaining red velvet batter on top. Gently spread it to cover the cream cheese layer. Bake in the preheated oven for 30 to 35 minutes. Check if they are done by inserting a toothpick into the center. If it comes out clean, they’re ready.
Let the brownies cool in the pan before slicing them into squares. Enjoy your delicious red velvet cheesecake brownies!
Tips & Tricks
Achieving the Perfect Texture
To get the best texture for your brownies, focus on mixing. Don’t overmix the batter after adding flour. This helps keep the brownies soft. Use room temperature eggs for better blending. The cream cheese layer should be smooth and creamy. It adds a nice contrast to the brownies.
Common Mistakes to Avoid
One common mistake is not measuring ingredients. Use a kitchen scale for precision. Another mistake is baking too long. Check for doneness around 30 minutes. A toothpick should have a few moist crumbs, not wet batter. Lastly, don’t skip the cooling step. Cutting them too soon can make a mess.
Enhancing Flavor and Presentation
Use high-quality cocoa powder for a rich taste. Try adding a pinch of espresso powder to deepen the chocolate flavor. For presentation, dust the brownies with powdered sugar. Add fresh raspberries or strawberries on the side for color. Serve on a nice platter to impress your guests.
Pro Tips
- Use Room Temperature Ingredients: Ensure that your cream cheese and eggs are at room temperature for a smoother cheesecake layer.
- Don’t Overmix the Batter: Mix the brownie batter just until combined to maintain a fudgy texture.
- Swirl with Care: When creating the marbled effect, use a gentle hand to avoid fully blending the layers.
- Let Them Cool: Allow the brownies to cool completely in the pan before slicing for cleaner edges.
Variations
Red Velvet Cheesecake Brownies with Nuts
You can add nuts for a nice crunch. I like walnuts or pecans. Chop them finely and sprinkle them onto the brownie batter. Just fold them in gently to keep the texture. This adds a lovely nutty flavor. The nuts also contrast well with the soft cheesecake layer.
Gluten-Free Red Velvet Brownies
To make these brownies gluten-free, swap regular flour for a gluten-free blend. Look for blends that include xanthan gum, which helps with texture. Follow the same steps in the recipe. Your brownies will still be rich and tasty, perfect for everyone.
Vegan Option for Cheesecake Brownies
You can easily make this dessert vegan. Use melted coconut oil instead of butter. Replace eggs with flax eggs, made from ground flaxseed and water. For the cream cheese layer, use a vegan cream cheese. Mix it with powdered sugar and a splash of almond milk. This way, you can enjoy all the flavors while keeping it plant-based.
Storage Info
Best Practices for Storing Brownies
To keep your red velvet cheesecake brownies fresh, store them in an airtight container. You can keep them at room temperature for up to three days. If you want them to last longer, put them in the fridge. This will keep them tasty for about a week. Just remember to let them come to room temperature before eating. The flavors will shine through better this way.
How to Freeze for Longer Storage
Freezing is a great option for longer storage. First, cut the brownies into squares. Then, wrap each square in plastic wrap. After that, place them in a freezer bag or container. Make sure to remove as much air as possible. You can freeze them for up to three months. When you’re ready to enjoy them, just pull out a square and let it thaw in the fridge overnight.
Reheating Tips for Enjoying Leftovers
To warm up your brownies, use the microwave or the oven. For the microwave, heat for about 10-15 seconds. Check to see if it’s warm enough. If you use the oven, set it to 350°F (175°C). Put the brownies on a baking sheet and heat for about 5-7 minutes. This will make them soft and gooey, just like when they were fresh! Enjoy the delightful taste again!
FAQs
What is the origin of red velvet desserts?
Red velvet desserts trace back to the 1800s. They gained fame in the Southern United States. These treats were known for their rich, red hue and soft texture. The red color often came from cocoa powder and buttermilk. Many believe it symbolizes love and romance. Today, red velvet is a favorite for cakes and brownies alike. Its unique flavor mixes cocoa with a hint of vanilla.
Can I make these brownies in advance?
Yes, you can make these brownies in advance. Prepare them a day or two ahead for best results. Let the brownies cool completely before covering them. Store them in an airtight container at room temperature. This keeps them fresh and moist. If you want to store them longer, freeze them. Wrap each brownie in plastic wrap, then place them in a freezer-safe bag. Thaw at room temperature when ready to enjoy.
How do I know when the brownies are done baking?
To check if the brownies are done, use a toothpick. Insert it into the center of the brownies. If it comes out clean, they are ready. You may see a few moist crumbs, but no wet batter. Baking times can vary, so keep an eye on them. Start checking around 30 minutes. Remember, they will continue to cook a bit after you take them out.
In this blog post, we explored the rich world of red velvet cheesecake brownies. We covered key ingredients to perfect each layer, along with tips to avoid common mistakes. You learned step-by-step how to make this treat and its variations, including gluten-free options. Remember to store your brownies well for lasting freshness. These small details can make a big difference in your baking. Enjoy the process and taste the result