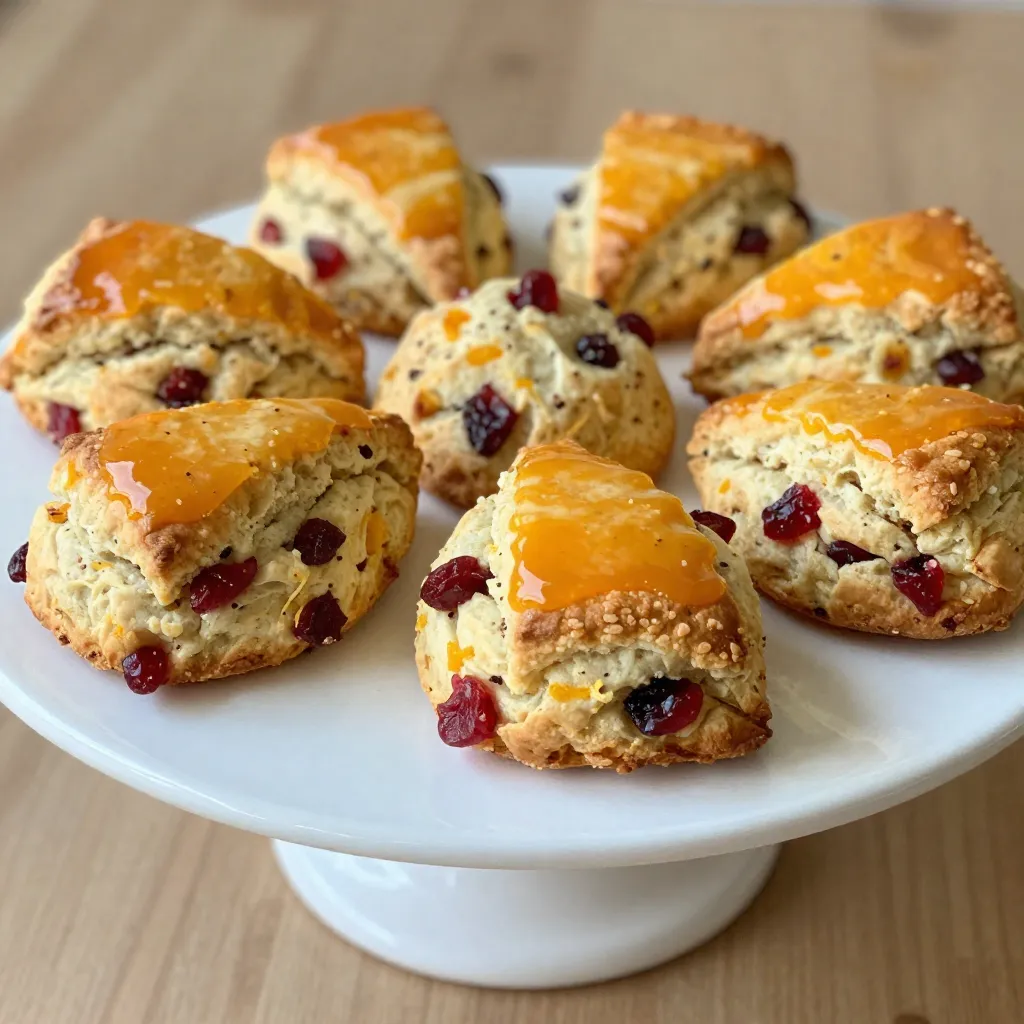
If you crave a treat that’s both sweet and tangy, you’re in the right place! My Orange Glazed Cranberry Scones are a perfect blend of flavor and texture. They’re fluffy, buttery, and topped with a zesty orange glaze that will make your taste buds dance. Plus, I’ll share tips, variations, and storage secrets to ensure you enjoy them fresh and delicious. Let’s get baking these irresistible scones together!
Why I Love This Recipe
- Bright Flavors: The combination of orange zest and cranberries brings a refreshing taste that is perfect for breakfast or a snack.
- Quick and Easy: This recipe comes together in just 35 minutes, making it a great option for busy mornings.
- Perfectly Moist: The addition of heavy cream ensures these scones are tender and moist, unlike many traditional scone recipes.
- Gorgeous Presentation: With a glossy orange glaze and a sprinkle of zest, these scones are as beautiful as they are delicious.
Ingredients
Key Ingredients for Scones
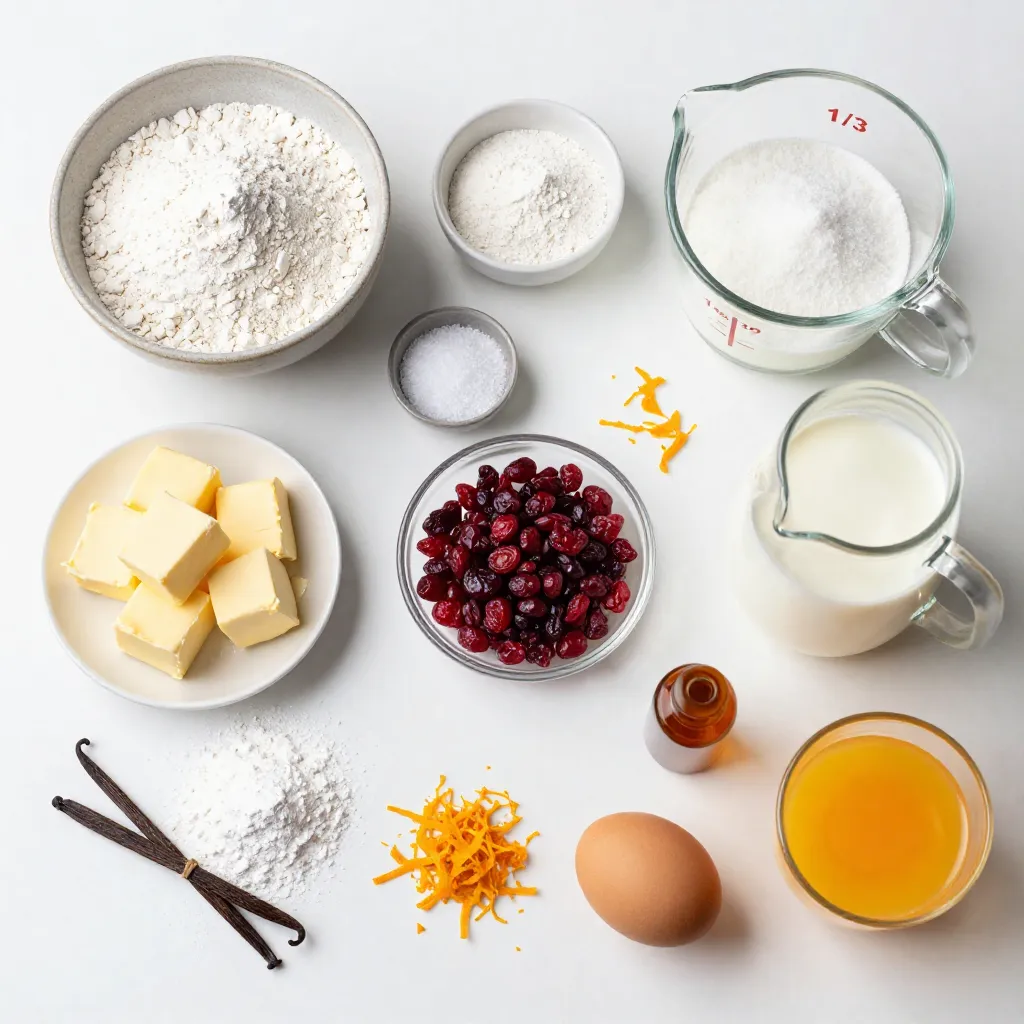
To make these tasty orange glazed cranberry scones, gather these key ingredients:
– 2 cups all-purpose flour
– 1/3 cup granulated sugar
– 1 tablespoon baking powder
– 1/2 teaspoon salt
– 1/4 cup cold unsalted butter, cubed
– 1/2 cup dried cranberries
– Zest of 1 orange
– 1/2 cup heavy cream
– 1 large egg
– 1 teaspoon vanilla extract
These ingredients blend together to create a soft, tender scone. The dried cranberries add a nice chewy texture, while the orange zest brightens the flavor.
Ingredients for Orange Glaze
For the sweet orange glaze, you’ll need:
– 1 cup powdered sugar
– 2 tablespoons fresh orange juice
– 1 teaspoon orange zest
This glaze gives the scones a lovely shine and a burst of citrus flavor. It’s easy to mix up and adds a nice touch.
Suggested Tools and Equipment
Having the right tools makes the cooking process smooth. Here’s what you will need:
– Large mixing bowl
– Whisk
– Pastry cutter or your fingers for blending
– Baking sheet
– Parchment paper
– Small bowl for the glaze
Using these tools will help you create perfect scones. They make mixing and baking easy and fun.
Step-by-Step Instructions
Preparing the Dough
Start by preheating your oven to 400°F (200°C). Line a baking sheet with parchment paper. In a large bowl, whisk together 2 cups of all-purpose flour, 1/3 cup of sugar, 1 tablespoon of baking powder, and 1/2 teaspoon of salt. This mix forms the base of your scones. Next, add 1/4 cup of cold, cubed unsalted butter. Use a pastry cutter or your fingers to mix until it looks like coarse crumbs. Then, stir in 1/2 cup of dried cranberries and the zest of 1 orange. In a separate bowl, whisk together 1/2 cup of heavy cream, 1 large egg, and 1 teaspoon of vanilla extract. Pour this wet mix into the dry mix and stir until just combined. The dough will be slightly sticky.
Shaping and Cutting the Scones
Transfer the dough to a floured surface. Pat it down gently to form a circle about 1 inch thick. Use a sharp knife to cut this circle into 8 wedges. Place these wedges on your prepared baking sheet. Make sure to leave some space between them for even baking.
Baking the Scones
Bake the scones in your preheated oven for 15 to 20 minutes. They should turn lightly golden. To check if they are done, insert a toothpick into the center; it should come out clean. While the scones bake, prepare the glaze. In a small bowl, whisk together 1 cup of powdered sugar, 2 tablespoons of fresh orange juice, and 1 teaspoon of orange zest until smooth. Once the scones cool a little, drizzle the glaze over the top. Enjoy your warm scones with tea or coffee!
Tips & Tricks
Ensuring Perfectly Moist Scones
To make moist scones, always use cold butter. Cold butter creates pockets of steam, making your scones rise and stay soft. Cut the butter into small cubes and mix it quickly with the flour until it looks like coarse crumbs. Do not overmix your dough. Mix just enough for it to come together. A bit of stickiness is okay. It helps keep the scones moist.
How to Make the Best Orange Glaze
For a tasty orange glaze, use fresh orange juice. It adds a bright and zesty flavor. Combine 1 cup of powdered sugar with 2 tablespoons of fresh orange juice and 1 teaspoon of orange zest. Whisk until smooth. Adjust the glaze by adding more powdered sugar if it’s too thin. Drizzle it over your warm scones for a sweet finish that shines.
Common Mistakes to Avoid
One common mistake is overbaking. Keep an eye on your scones as they bake. They should be lightly golden. Use a toothpick to check for doneness; it should come out clean. Another mistake is not using enough flour on your surface. This can make the dough stick. Always flour your surface well before patting out the dough. Lastly, don’t skip the orange zest. It adds vital flavor that makes these scones special!
Pro Tips
- Use Cold Ingredients: Ensure your butter and cream are cold. This helps create a flaky texture in your scones.
- Don’t Overmix: Mix the dough until just combined. Overmixing can lead to tough scones.
- Experiment with Flavors: Feel free to add nuts or substitute the cranberries with other dried fruits like cherries or blueberries for variety.
- Store Properly: Keep any leftover scones in an airtight container at room temperature for up to 2 days to maintain freshness.
Variations
Adding Flavors or Ingredients
You can change the flavors of your scones easily. Try adding nuts like walnuts or pecans. They add a nice crunch. You can also use different fruits. Dried cherries or blueberries work well. If you like spice, a dash of cinnamon or nutmeg adds warmth. Mix and match until you find your favorite blend.
Vegan Adjustments
Making these scones vegan is simple. Replace the heavy cream with almond milk or coconut cream. Use a flax egg instead of a regular egg. To make a flax egg, mix 1 tablespoon of ground flaxseed with 2.5 tablespoons of water. Let it sit for 5 minutes. This will bind your ingredients just like an egg.
Gluten-Free Substitutes
Need gluten-free scones? Swap the all-purpose flour for a gluten-free blend. Look for blends that include xanthan gum. This helps your scones hold together. Ensure your baking powder is gluten-free too. With these changes, you can enjoy delicious scones without gluten!
Storage Info
How to Store Scones Properly
To keep your orange glazed cranberry scones fresh, store them in an airtight container. This keeps moisture in and prevents them from getting dry. Place a piece of parchment paper between layers if you stack them. This method helps maintain their shape and glaze.
Freezing Instructions
You can freeze scones for later enjoyment. First, cool them completely. Then, wrap each scone tightly in plastic wrap. Place them in a freezer-safe bag or container. They can last up to three months in the freezer. Just remember to label the bag with the date!
Best Ways to Reheat
To reheat scones, preheat your oven to 350°F (175°C). Place the scones on a baking sheet. Heat them for about 10 minutes. If you prefer a microwave, warm one scone for 15-20 seconds. Just note that the oven gives a better texture. Enjoy your warm scones!
FAQs
Can I use fresh cranberries instead of dried?
Yes, you can use fresh cranberries. Fresh cranberries add a tart flavor. You may need to add more sugar to balance the tartness. Chop them in half for even mixing.
How do I know when the scones are done?
Scones are done when they turn light golden. Use a toothpick to check the center. If it comes out clean, your scones are ready. They should feel firm but springy to the touch.
Can I prepare the dough in advance?
You can prepare the dough ahead of time. Wrap it tightly in plastic wrap. Store it in the fridge for up to 24 hours. This helps the flavors meld together nicely.
What can I substitute for heavy cream?
You can use whole milk or half-and-half. For a lighter option, try unsweetened almond milk. If using milk, add a little extra butter to mimic the fat in cream.
How long do scones last at room temperature?
Scones stay fresh for about two days at room temperature. Keep them in an airtight container. For longer storage, consider freezing them. They can last up to three months in the freezer.
Now you have the tools to make perfect scones. We covered key ingredients, steps, and tips. You learned how to shape and bake scones, plus ways to customize them. Remember to store them right to keep them fresh. You can even freeze extras for later! With these insights, you can impress anyone with your tasty treats. Enjoy your baking and share your delicious scones with friend