Looking for a dessert that is both easy and delicious? You’re in the right spot! This No-Bake Key Lime Pie is packed with tangy flavor and creamy goodness. Made with simple ingredients, it comes together without turning on the oven. Whether it’s a special occasion or a sweet craving, this pie is sure to impress. Dive into this easy recipe and learn how to whip up your new favorite treat!
Why I Love This Recipe
- Refreshing Flavor: This key lime pie is the perfect balance of tart and sweet, making it a refreshing dessert for any occasion.
- No-Bake Convenience: With no baking required, this recipe is incredibly easy and quick to prepare, allowing you to enjoy your time with family and friends.
- Coconut Twist: The addition of coconut flakes in the crust adds a delightful texture and flavor, elevating this classic dessert.
- Beautiful Presentation: Garnishing with lime slices and mint leaves not only enhances the visual appeal but also adds a burst of freshness in every slice.
Ingredients
Main ingredients for the pie
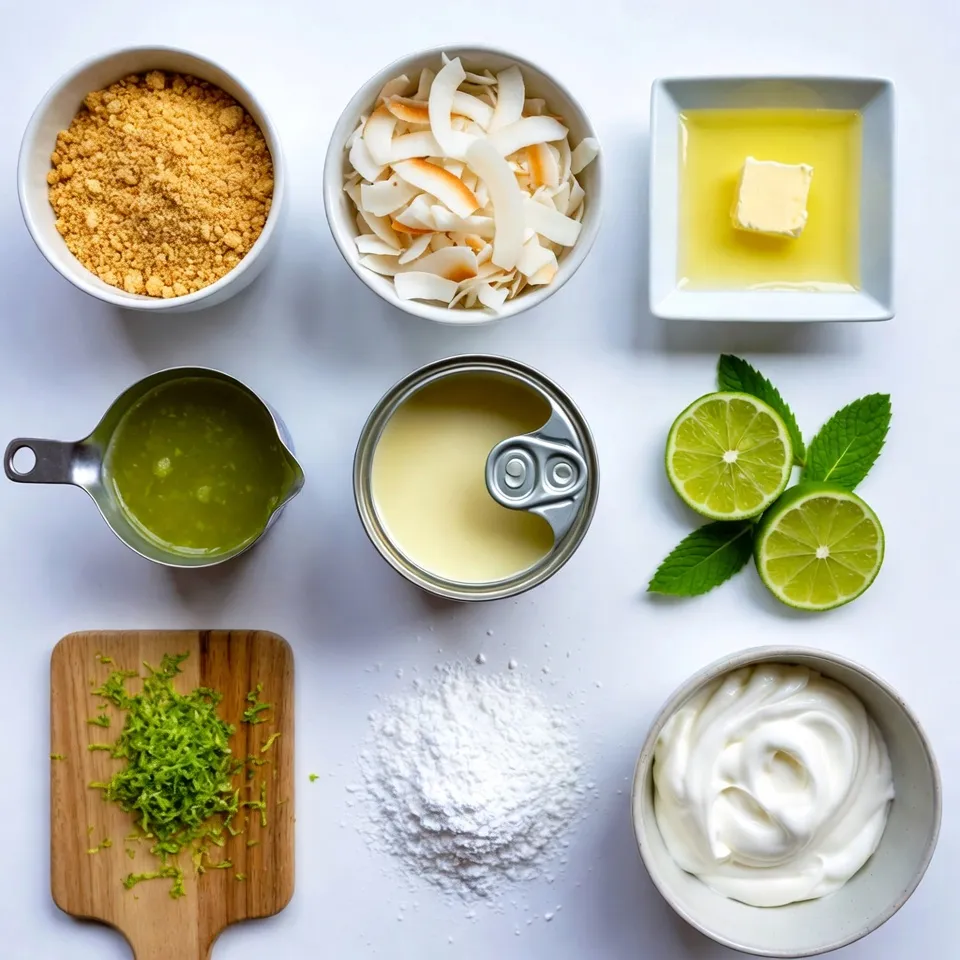
– 1 can (14 ounces) sweetened condensed milk
– 1/2 cup fresh key lime juice (or regular lime juice)
– Zest of 2 key limes
– 1 cup heavy whipping cream
– 1/4 cup powdered sugar
The main ingredients for this pie create its bright, tangy flavor. Key lime juice is special. It gives the pie a unique taste. Regular lime juice works too, but it’s not the same. Key limes are smaller and a bit sweeter. They pack more flavor into each drop. This is why I prefer using them.
Ingredients for the crust
– 1 cup graham cracker crumbs
– 1/4 cup unsweetened coconut flakes
– 1/2 cup unsalted butter, melted
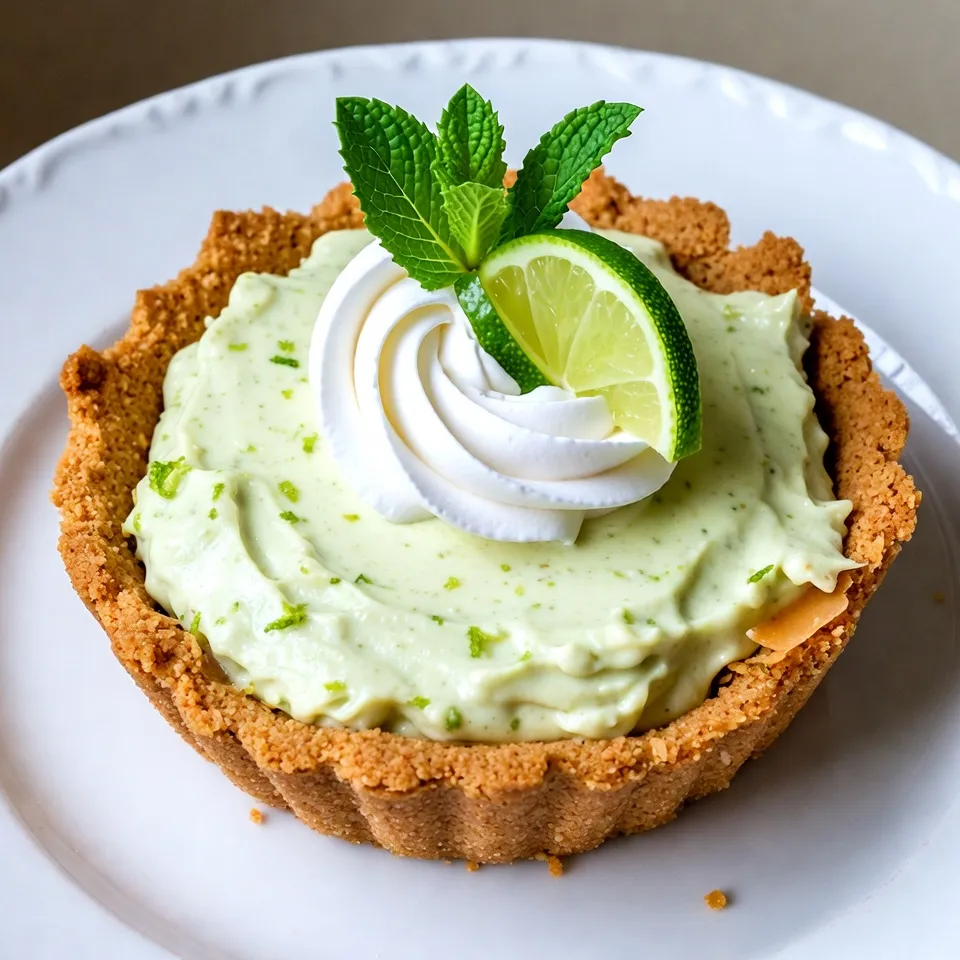
The crust is just as important as the filling. I use graham cracker crumbs because they add a sweet crunch. Coconut flakes give it a bit of chew and flavor. If you want to switch things up, try an almond flour crust for gluten-free needs. You can also use crushed Oreos for a fun twist. Just remember, the crust sets the stage for the pie, so choose wisely!
Step-by-Step Instructions
Preparing the crust
1. Mixing the graham cracker and coconut
Start by taking a bowl. Add 1 cup of graham cracker crumbs and 1/4 cup of unsweetened coconut flakes. Stir them together. Make sure they mix well. This will give your crust a nice flavor.
2. Pressing the crust into the pie plate
Next, pour in 1/2 cup of melted unsalted butter. Mix until all crumbs are coated. Now, take a 9-inch pie plate. Press the mixture firmly into the bottom and up the sides. It should be even. Now, put it in the fridge while you make the filling.
Making the key lime filling
1. Combining sweetened condensed milk, lime juice, and zest
In another bowl, add 1 can of sweetened condensed milk. Pour in 1/2 cup of fresh key lime juice. Add zest from 2 key limes. Mix everything until it looks smooth. This gives the filling a tangy taste.
2. Whipping the cream and folding it into the mixture
In a clean bowl, whip 1 cup of heavy cream. Use an electric mixer until soft peaks form. Slowly add 1/4 cup of powdered sugar while mixing. Continue until stiff peaks form. Gently fold this whipped cream into the lime mixture. This keeps the filling light and airy.
Assembling and chilling the pie
1. Pouring the filling into the crust
Carefully pour the key lime filling into the chilled crust. Smooth the top with a spatula. Make sure it is evenly spread out.
2. Tips for chilling time and texture
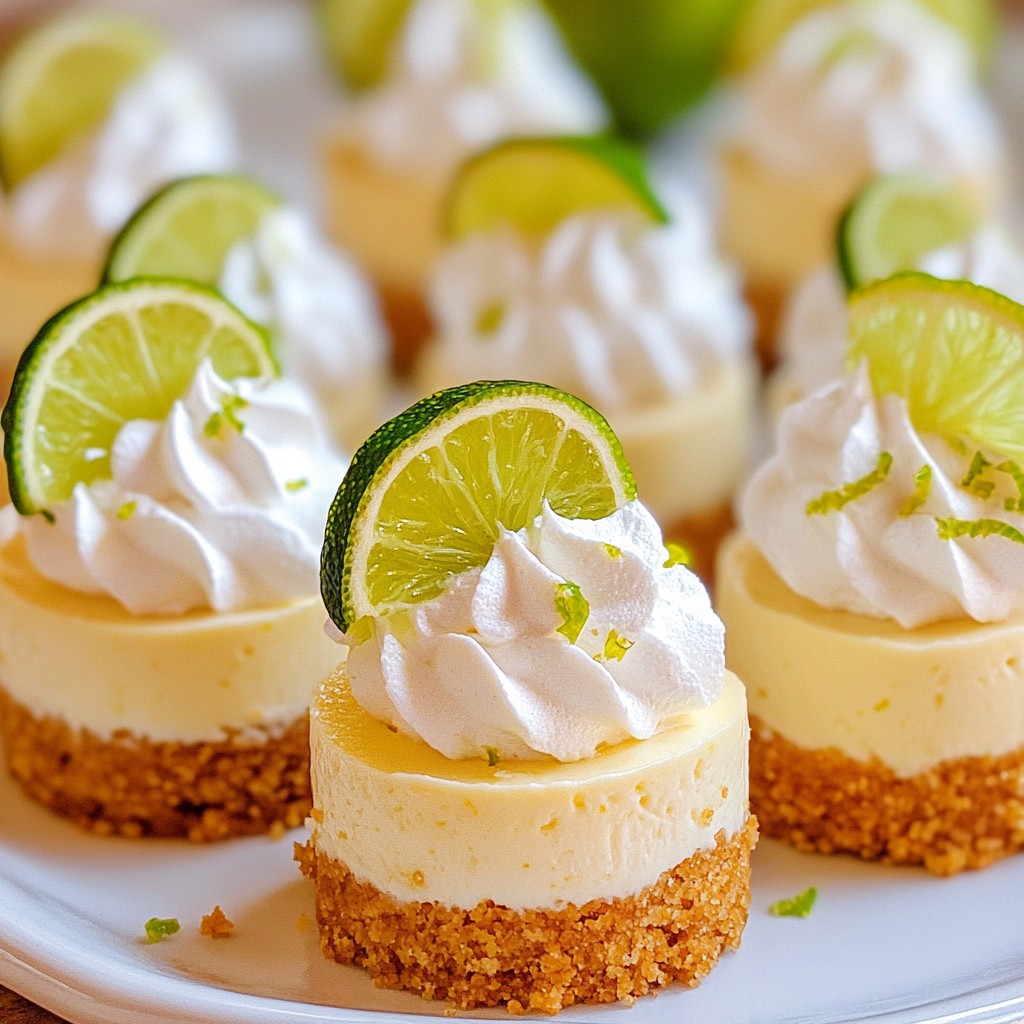
Cover the pie with plastic wrap and put it in the fridge. Chill for at least 4 hours. For the best results, chill overnight. This helps the pie set well. When ready, garnish with lime slices and mint leaves for a fresh touch.
Tips & Tricks
Perfecting the pie’s texture
To get the right consistency for your no-bake key lime pie, you need to focus on two key steps. First, when you mix the sweetened condensed milk with lime juice and zest, whisk it well. This helps the flavors blend smoothly. Next, when whipping the heavy cream, beat it until you see stiff peaks. This adds air to the cream, making your pie light and fluffy.
Proper refrigeration time is also vital. Chill the pie for at least four hours, but overnight is best. This allows the filling to set properly. A well-chilled pie will slice beautifully and hold its shape.
Serving suggestions
When it’s time to serve, think about presentation. Use chilled plates for a nice touch. You can drizzle a little extra lime juice on top for more zing. For added flair, sprinkle some extra coconut flakes on the pie.
As for drink pairings, a cold glass of sparkling water with lime complements the pie well. If you want something richer, consider a light white wine or a fruity cocktail. Both will enhance the pie’s zesty flavors and make your dessert even more enjoyable.
Pro Tips
- Chill Your Mixing Bowl: For a fluffier whipped cream, chill your mixing bowl in the refrigerator for 10-15 minutes before whipping. This helps the cream whip up faster and increases volume.
- Use Fresh Limes: For the best flavor, always use fresh key limes or regular limes instead of bottled lime juice. Fresh lime juice offers a vibrant taste and aroma that enhances your pie.
- Let It Set: For optimal texture and flavor, allow the pie to set in the refrigerator for at least 4 hours, but overnight is best. This helps the filling firm up and improves the overall taste.
- Garnish with Care: When garnishing, use fresh mint leaves and lime slices just before serving to keep them vibrant and fresh. This adds an appealing touch to your dessert presentation.
Variations
Alternative flavors and additions
You can switch things up with different fruits or flavors. For a berry twist, try adding fresh raspberries or blueberries into the lime filling. Just fold in a cup of your favorite fruit before pouring it into the crust. You can also mix in a hint of vanilla or coconut extract for an extra layer of flavor.
When it comes to whipped cream, you can make it more fun. Try adding a splash of vanilla, or even some crushed berries to the cream. This gives your pie a beautiful color and taste. For a chocolate kick, fold in cocoa powder or melted chocolate into the whipped cream.
Dietary adaptations
If you’re looking for gluten-free options, you can use almond flour or gluten-free graham crackers for the crust. Just mix the flour with melted butter like you would with graham cracker crumbs.
For those who want a dairy-free version, use coconut cream instead of heavy cream. It gives a rich texture and a slight coconut taste. You can find coconut cream in cans at most stores. Just chill it, then whip it like regular cream. Both adaptations keep your dessert delicious and satisfying.
Storage Info
How to store the pie
To keep your no-bake key lime pie fresh, store it in the fridge. Cover the pie with plastic wrap to prevent drying. This helps keep the crust crisp and the filling creamy. The pie stays good for up to five days. If you can, enjoy it within the first two days for the best taste.
Freezing options
If you have leftovers, you can freeze the pie. First, slice it into individual servings. Wrap each slice in plastic wrap and then place them in a freezer-safe bag. This keeps them fresh for about two months.
To thaw the pie, move it from the freezer to the fridge for a few hours. If you’re in a hurry, you can leave it out at room temperature for about 30 minutes. Once it’s ready, serve with fresh lime slices and mint leaves for a burst of flavor. Enjoy!
FAQs
How do I know when the pie is set?
The pie is set when the filling is firm and holds its shape. You can gently shake the pie plate. If the filling wobbles slightly but does not move too much, it is ready. Another sign is that the top will look smooth and shiny. It should not feel wet or runny.
Can I make this pie ahead of time?
Yes, you can make this pie ahead of time. I recommend preparing it the night before you plan to serve it. This gives the pie time to set properly in the fridge. It also allows the flavors to blend well.
What can I use instead of key limes?
If you cannot find key limes, you can use regular limes. They will give a similar tart flavor but with a slight difference. Key limes are smaller and have a more intense taste. You can also mix lemon juice for a different twist. Just remember that this will change the pie’s flavor a bit.
In this post, we explored the key ingredients for an amazing key lime pie, including the crust options and filling techniques. I shared tips for perfecting the flavor and texture.
Remember, cooking is about joy and creativity. With these steps and tips, you can make a delicious pie and impress friends and family. Don’t hesitate to try different flavors or variations. Enjoy your baking journe