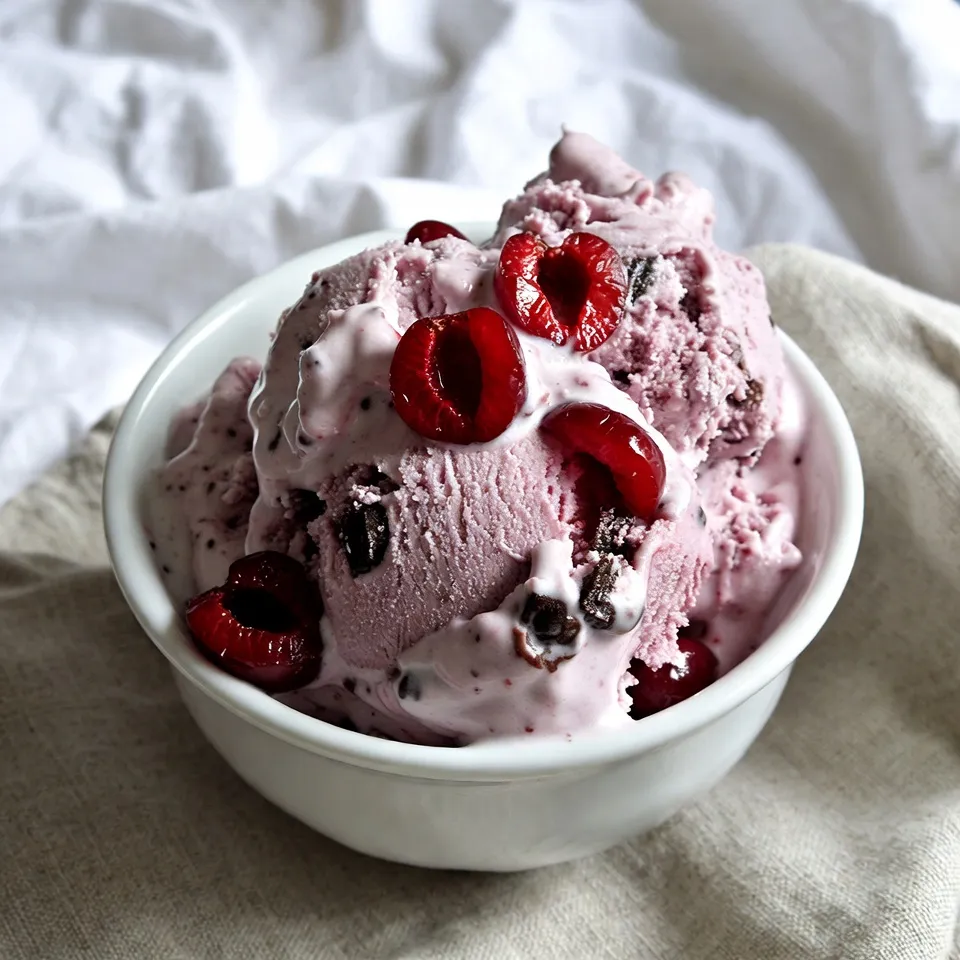
Are you ready to treat yourself to a sweet delight? Making Cherry Chocolate Chunk Ice Cream at home is simple and fun! With fresh cherries, creamy goodness, and rich chocolate, this dessert will impress everyone. Whether you’re cooling off on a hot day or celebrating a special occasion, this recipe is perfect. Let’s dive into the easy steps to create this frozen treat that you’ll crave all summer long!
Why I Love This Recipe
- Fresh and Fruity: The combination of cherries and chocolate creates a delightful balance of flavors, making each bite a sweet treat.
- Easy to Make: This recipe requires simple ingredients and straightforward steps, perfect for anyone looking to whip up a delicious dessert.
- Perfect for Summer: There’s nothing quite like homemade ice cream on a hot day, and this cherry chocolate chunk version is exceptionally refreshing.
- Customizable: You can easily adjust the sweetness or add more chocolate chunks based on your preferences, making it a versatile recipe.
Ingredients
Detailed List of Ingredients
– 2 cups fresh or frozen cherries, pitted and halved
– 1 cup heavy cream
– 1 cup whole milk
– ¾ cup granulated sugar
– 1 teaspoon vanilla extract
– ½ cup dark chocolate chunks
– ¼ teaspoon salt
– 1 tablespoon lemon juice
For this cherry chocolate chunk ice cream, you need a mix of simple, fresh ingredients. The cherries give the ice cream a sweet and tart flavor. You can use fresh cherries or frozen ones. Fresh cherries are great in summer, while frozen ones work well all year.
The heavy cream and whole milk create a rich base. They make the ice cream smooth and creamy. Granulated sugar adds sweetness. The salt balances the flavors perfectly.
Vanilla extract brings warmth to the dish, while lemon juice adds a nice brightness. The dark chocolate chunks add texture and a rich taste. You want to use high-quality chocolate for the best flavor.
Gather these ingredients and get ready to create a delightful treat.

Step-by-Step Instructions
Cooking the Cherry Mixture
To start, we need to create a sweet cherry mix. In a medium saucepan, add the cherries, 2 tablespoons of sugar, and lemon juice. Cook this mix over medium heat for about 5-7 minutes. You want the cherries to soften and release their juices. Once done, take the pan off the heat and let it cool slightly. This cooling step is key. It helps in blending the flavors without cooking the cream later.
Preparing the Ice Cream Base
Next, we make our creamy base. In a large mixing bowl, whisk together 1 cup of heavy cream, 1 cup of whole milk, ½ cup of sugar, 1 teaspoon of vanilla extract, and ¼ teaspoon of salt. Keep whisking until the sugar fully dissolves. This step is important for a smooth texture. After that, add the cooled cherry mixture to the bowl. Remember to save a few cherries for later as a garnish. Stir everything until well mixed. The colors and smells will start to come together beautifully.
Churning the Ice Cream
Now, it’s time for some fun! Pour your mixture into an ice cream maker. Churn it according to the manufacturer’s instructions, which usually takes about 20-25 minutes. You want it to reach a soft-serve consistency. In the last few minutes of churning, gently fold in the dark chocolate chunks. This adds a rich flavor that pairs perfectly with the cherries.
Freezing Instructions
Once churning is complete, transfer the ice cream into an airtight container. Press a piece of plastic wrap directly onto the ice cream’s surface. This step helps prevent ice crystals from forming. Now, freeze the ice cream for at least 4 hours, or until it’s firm. This waiting period builds up the flavor and texture, making each scoop a delight.
Tips & Tricks
Getting the Perfect Ice Cream Texture
Churning time is key for smooth ice cream. When you churn, air mixes in and gives your ice cream a light feel. Aim for about 20-25 minutes in your ice cream maker. Stop once it reaches a soft-serve state. This way, you get that creamy texture without ice crystals.
To prevent ice crystals, store your ice cream properly. After churning, press plastic wrap onto the surface before sealing it in an airtight container. This step keeps air out and helps your ice cream stay smooth.
Enhancing Flavor and Presentation
For toppings, think about what you love. You can add whipped cream, nuts, or a drizzle of chocolate sauce. Fresh cherry halves on top add color and a pop of flavor.
When serving, use chilled bowls. This keeps your ice cream cold longer. A sprinkle of extra chocolate chunks on top makes it look fancy and inviting. Enjoy every scoop!
Pro Tips
- Use Fresh Cherries: Fresh cherries will provide the best flavor and texture. If using frozen, make sure they are pitted and thawed before cooking.
- Chill Your Mixture: For a creamier texture, chill the ice cream mixture in the refrigerator for 1-2 hours before churning.
- Dark Chocolate Quality: Choose high-quality dark chocolate for the chunks; it enhances the overall flavor of the ice cream.
- Prevent Ice Crystals: Press plastic wrap directly onto the surface of the ice cream before sealing the container to minimize ice crystal formation.
Variations
Dairy-Free Option
If you want a dairy-free version of this cherry chocolate chunk ice cream, you can easily swap the cream and milk. Use coconut cream and almond milk instead. These options give a rich flavor without dairy. Make sure you pick unsweetened almond milk. This change keeps the taste smooth and creamy.
Additional Flavor Add-Ins
You can make this ice cream even more fun by adding extra flavors. Try adding chopped nuts like almonds or pecans for a nice crunch. A sprinkle of cinnamon can also bring warmth to the flavor. If you love dark chocolate, you can switch to milk chocolate or even white chocolate chunks.
Using Different Fruits
Cherry pairs well with chocolate, but you can try other fruits too. Raspberries work great since they are tart and sweet. Strawberries can add a fresh taste, and blueberries offer a nice berry flavor. Just remember to adjust the sugar if your fruit is sweeter or more tart. Mixing these fruits with chocolate will give you new and tasty results!
Storage Info
Storing Homemade Ice Cream
To keep your cherry chocolate chunk ice cream fresh, proper storage is key. First, choose the right container. I recommend using an airtight container. These help prevent ice crystals from forming. You can also use a freezer-safe glass jar. It’s great for keeping flavors intact. Before sealing, press plastic wrap directly onto the surface. This extra step cuts off air and keeps your ice cream smooth.
Freezer Duration
Your homemade ice cream will stay good in the freezer for about two weeks. After that, it may start to lose flavor and texture. Look for signs of freezer burn, like icy patches or dry spots. If you see these, your ice cream may not taste as good. For the best experience, enjoy it within two weeks!
FAQs
Can I use frozen cherries instead of fresh?
Yes, you can use frozen cherries. Frozen cherries have many benefits. They are often picked at peak ripeness, which means they are sweet and juicy. Using frozen fruit can save you time. You don’t need to pit or chop them. They also work well in ice cream since they blend nicely into the cream mixture. Just remember to thaw them slightly before using.
What if I don’t have an ice cream maker?
If you don’t have an ice cream maker, don’t worry! You can still make this delicious treat. Pour your mixture into a shallow dish. Place it in the freezer. Stir the mixture every 30 minutes for about 3-4 hours. This helps break up ice crystals. Once it’s creamy and soft, it’s ready to serve!
How can I make the ice cream softer before serving?
To soften homemade ice cream, let it sit out for about 5-10 minutes. This will make it easier to scoop. You can also place it in the fridge for 15-20 minutes if you want it even softer. This way, you can enjoy each scoop without any struggle!
You can make delicious cherry ice cream at home with just a few ingredients. The fresh or frozen cherries combine well with cream, sugar, and chocolate. Remember to churn your mixture properly for smooth texture. You can even try different fruits or toppings for variety.
Homemade ice cream is fun and rewarding. With these steps, you’ll create a treat everyone loves. Enjoy the process and share your tasty result