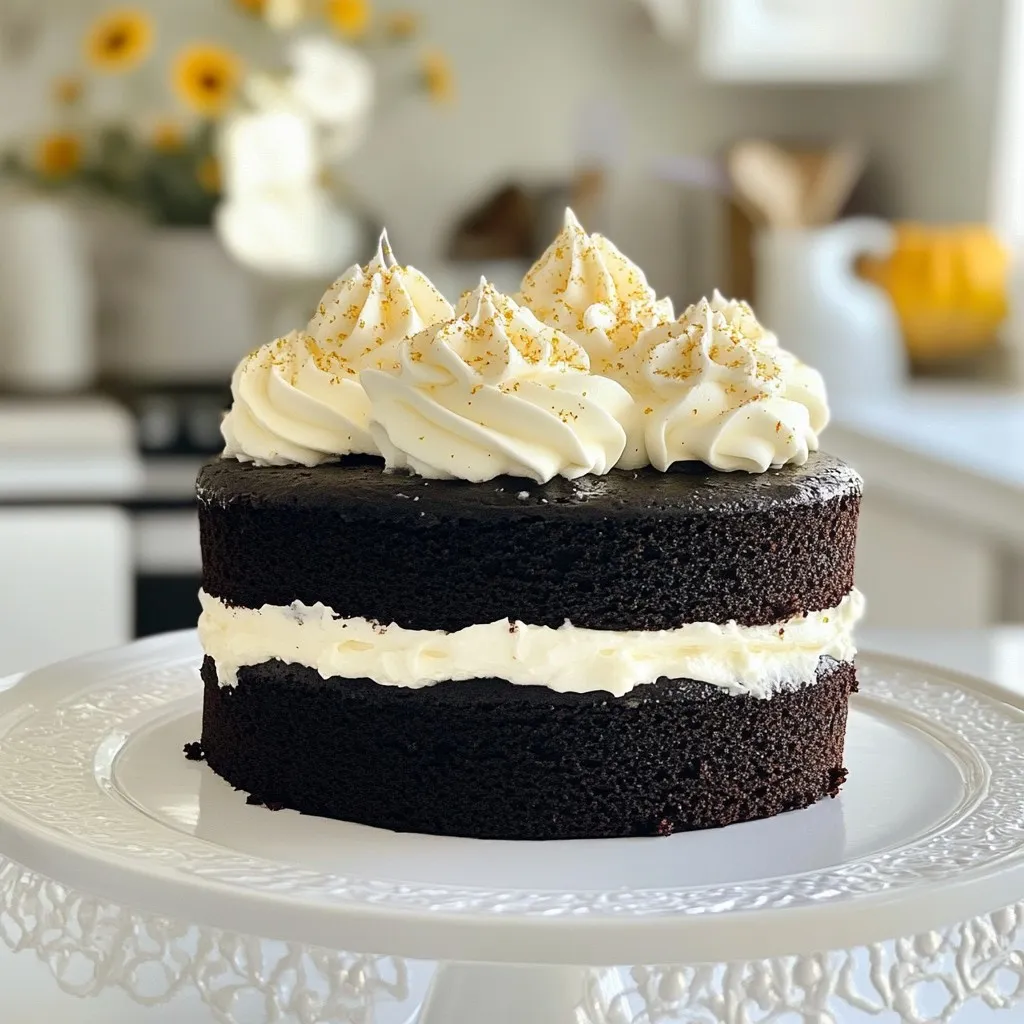
Are you ready to bake a treat that’s as spooky as it is delicious? This Black Velvet Halloween Cake combines rich cocoa with a dark twist that will impress your guests. In this guide, I’ll share simple steps to create a scrumptious cake that’s perfect for your Halloween party. Get ready to blend flavors, add a spooky touch, and impress everyone with your baking skills! Let’s dive into the delight!
Why I Love This Recipe
- Spooky Aesthetic: This cake is perfect for Halloween with its striking black color and festive decorations.
- Moist and Rich: The combination of buttermilk and oil ensures that each slice is incredibly moist and rich in flavor.
- Easy to Make: With straightforward steps and readily available ingredients, this cake is accessible for bakers of all levels.
- Customizable: Add your favorite Halloween-themed decorations to make it uniquely yours!
Ingredients
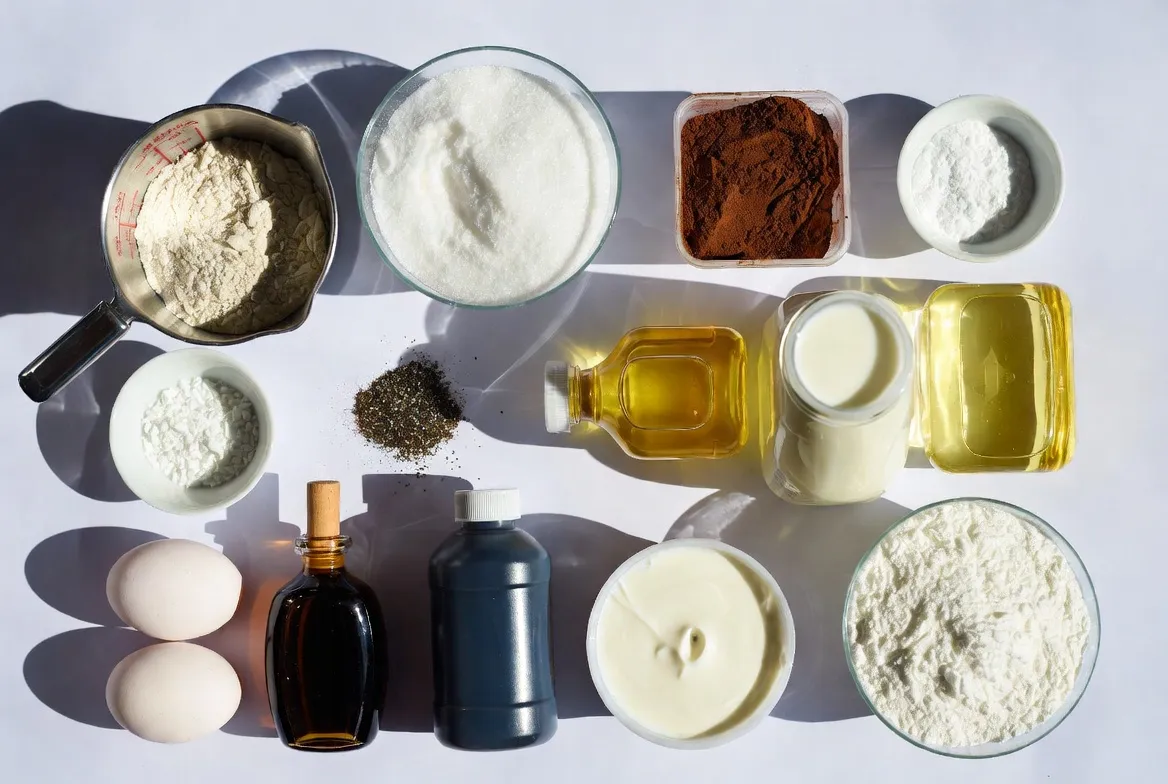
Making a Black Velvet Halloween Cake is fun and easy. Here’s what you need:
– 2 cups all-purpose flour
– 1 ¾ cups granulated sugar
– 1 cup unsweetened cocoa powder
– 1 teaspoon baking soda
– 1 teaspoon baking powder
– 1 teaspoon salt
– 1 ½ cups buttermilk, room temperature
– 1 cup vegetable oil
– 2 large eggs, room temperature
– 2 teaspoons vanilla extract
– 2 tablespoons black gel food coloring
– 1 cup heavy cream (for frosting)
– 1 cup powdered sugar (for frosting)
– 1 teaspoon vanilla extract (for frosting)
– Edible glitter or spooky decorations for garnish
Each ingredient plays a role. The flour gives structure. The sugar adds sweetness. Cocoa powder gives that rich, dark taste. Baking soda and baking powder help the cake rise. Salt balances flavors.
Buttermilk makes the cake moist. The vegetable oil keeps it soft. Eggs bind everything together and add richness. Vanilla extract adds a warm flavor. Black gel food coloring gives the cake its spooky look.
For the frosting, heavy cream whips into a light texture. Powdered sugar sweetens it without being gritty. The extra vanilla in the frosting boosts flavor. Finally, the edible glitter or decorations make the cake festive and fun.
Gather these ingredients, and you’re ready to bake a show-stopping Halloween treat!
Step-by-Step Instructions
Preparation Steps
– Preheat the oven to 350°F (175°C). Grease and flour two 9-inch round cake pans.
– In a large bowl, whisk together 2 cups of flour, 1 ¾ cups of sugar, 1 cup of cocoa powder, 1 teaspoon of baking soda, 1 teaspoon of baking powder, and 1 teaspoon of salt until mixed well.
– In another bowl, combine 1 ½ cups of buttermilk, 1 cup of vegetable oil, 2 large eggs, and 2 teaspoons of vanilla extract. Add 2 tablespoons of black gel food coloring and mix until the color is even.
Baking the Cake
– Pour the wet mixture into the dry ingredients. Stir gently until just mixed. Do not overmix.
– Divide the batter between the prepared pans. Tap the pans on the counter to release air bubbles.
– Bake for 30-35 minutes. Check with a toothpick; it should come out clean.
– Let the cakes cool in the pans for about 10 minutes. Then transfer them to a wire rack to cool completely.
Frosting and Decorating
– While the cakes cool, prepare the frosting. Whip 1 cup of heavy cream until it thickens. Gradually add 1 cup of powdered sugar and 1 teaspoon of vanilla extract. Continue to whip until soft peaks form.
– Once the cakes are cool, place one layer on a serving platter. Spread frosting on top. Add the second layer and frost the top and the sides of the cake.
– Decorate the cake with edible glitter or spooky decorations. Get creative with your Halloween theme!
Tips & Tricks
Baking Tips
To bake a perfect Black Velvet Halloween Cake, follow these steps:
– Ensure cakes are thoroughly baked: Insert a toothpick into the center. If it comes out clean, the cake is done.
– Avoid common baking mistakes: Don’t overmix the batter. This can make the cake tough. Also, ensure your oven is preheated. An oven thermometer helps.
Frosting Tips
Creating the ideal whipped frosting takes practice:
– Achieving the perfect whipped frosting: Start with cold heavy cream. Whip it until soft peaks form, but don’t overwhip.
– Tips for smooth frosting application: Use an offset spatula to spread frosting evenly. Work from the center out for best results.
Decoration Ideas
Make your cake stand out this Halloween:
– Creative Halloween-themed garnishes: Use edible glitter, plastic spiders, or candy pumpkins to add flair.
– Using edible glitter effectively: Sprinkle it lightly over the top. Too much can overwhelm the cake’s dark color.
Pro Tips
- Room Temperature Ingredients: Ensure that your buttermilk and eggs are at room temperature before mixing. This helps the batter to combine more smoothly and results in a more even cake texture.
- Don’t Overmix: When combining the wet and dry ingredients, mix until just combined. Overmixing can lead to a dense cake, so be gentle!
- Cooling Time: Let the cakes cool completely before frosting. This prevents the frosting from melting and ensures a cleaner finish when decorating.
- Decorative Touch: Get creative with your Halloween decorations! Use edible glitter, fondant shapes, or even spooky toppers to make your cake stand out at any Halloween gathering.
Variations
Decorating Alternatives
You can make this cake even more fun with different themes. Think about ghosts, pumpkins, or even creepy creatures. Use edible decorations that match your theme. For frosting, consider options like cream cheese or chocolate ganache. These frostings can add a new flavor twist. You can also use colored frosting to create spooky effects. Try piping spider webs or grave markers on the cake.
Dietary Modifications
If you need to adjust the recipe for diet needs, there are easy swaps. For a gluten-free version, use a gluten-free flour blend. This works well with the same amount as regular flour. If you want a vegan cake, substitute eggs with flaxseed meal or applesauce. Replace buttermilk with almond milk mixed with vinegar. These changes keep the cake moist and flavorful.
Storage Info
Storing Leftovers
To keep your Black Velvet Halloween Cake fresh, use airtight containers. These containers help prevent the cake from drying out. You can also wrap it tightly with plastic wrap. Store the cake in a cool, dry place. If you have frosting left over, store it in a separate container. The cake stays fresh for about 3 to 5 days.
Freezing Cake
You can freeze your Black Velvet Cake for later enjoyment. First, let the cake cool completely. Wrap each layer in plastic wrap. Then, place the wrapped layers in a freezer-safe bag. This helps protect the cake from freezer burn. You can freeze the cake for up to 3 months.
When you’re ready to eat it, remove it from the freezer. Unwrap the layers and place them in the fridge overnight. This method helps thaw the cake slowly. You can also let it sit at room temperature for a few hours if you’re in a hurry. Enjoy your spooky treat later!
FAQs
How to make a Black Velvet cake from scratch?
To make a Black Velvet cake, gather key ingredients first. You need:
– 2 cups all-purpose flour
– 1 ¾ cups granulated sugar
– 1 cup unsweetened cocoa powder
– 1 teaspoon baking soda
– 1 teaspoon baking powder
– 1 teaspoon salt
– 1 ½ cups buttermilk
– 1 cup vegetable oil
– 2 large eggs
– 2 teaspoons vanilla extract
– 2 tablespoons black gel food coloring
Start by preheating the oven to 350°F (175°C). Grease and flour two 9-inch round cake pans. In a large bowl, whisk the flour, sugar, cocoa powder, baking soda, baking powder, and salt. In another bowl, mix the buttermilk, oil, eggs, and vanilla. Add the black gel food coloring and mix until black. Combine the wet and dry ingredients gently. Pour the batter into the pans and bake for 30-35 minutes. Let the cakes cool completely. Frost with whipped cream and decorate for Halloween.
Can I use regular food coloring instead of gel?
You can use regular food coloring, but gel is better. Gel food coloring gives a richer color. It doesn’t add much liquid, so your cake stays moist. Regular liquid food coloring can make your batter too thin. This can change the cake’s texture. For a deep black color, always choose gel food coloring.
What makes a cake “velvet”?
A cake is called “velvet” because of its smooth texture. It feels soft and tender in your mouth. The key to this texture is the balance of ingredients. The buttermilk and oil keep it moist. The cocoa powder adds richness. The baking soda and baking powder help it rise. This combination makes the cake light while still being rich.
The blog covered how to make a delicious Black Velvet Cake. We talked about ingredients, preparation, baking steps, and decorating tips. I shared ways to customize your cake for Halloween or other themes, along with storage ideas and FAQs. Remember, baking is all about fun and creativity. Use the tips provided to make your cake special. Enjoy every bite and impress your friends with your baking skills! Happy bakin